
![]()
Many kitchen updates start with new cabinets. This one started with a problem. In a makeover shared by Instagram creator @tippyandpeashouse, the laminate finish on the kitchen cabinet doors began bubbling and lifting away from the surface after years of exposure to heat from nearby appliances.

Rather than replacing the cabinetry, she removed the failing laminate, mixed a custom paint color using Frenchic paint, and updated the kitchen for a fraction of the cost of a renovation.
The layout stayed the same, but painted cabinetry and a new color palette gave the kitchen a different appearance. More than a year after the project was completed, the finish was still holding up without touch-ups, showing that repainting damaged cabinet doors can extend the life of an existing kitchen when the underlying structure remains in good condition.
Heat Caused the Laminate to Fail

The makeover began when the cabinet doors started showing signs of damage.
Heat generated from kitchen appliances caused sections of the laminate covering to separate from the MDF underneath. Some doors developed bubbles while other areas began lifting around the edges. What began as a few damaged spots eventually spread across multiple doors.

Once the laminate started failing, patch repairs were no longer practical. The damage became noticeable across the kitchen and drew attention away from the rest of the room. Replacing every cabinet door would have been expensive, especially since the cabinet boxes themselves remained functional.
Instead of treating the problem as a reason to buy a new kitchen, she looked for a way to save what was already there.
The Laminate Had to Come Off First
Before any painting could begin, the damaged surface had to be removed.

Using a hair dryer (or you can try a head gun), she softened the adhesive behind the laminate and peeled the covering away from the cabinet doors. The process exposed the MDF underneath and removed the damaged finish.
According to the creator, the first few doors were stripped using an old hair dryer before it stopped working. A proper heat gun sped up the process and made removing the laminate much easier.
This stage required patience, but it also eliminated the source of the problem rather than covering it with paint. By removing the damaged layer first, the cabinet doors became ready for a fresh finish.
The Original Wood-Tone Finish Covered Every Cabinet

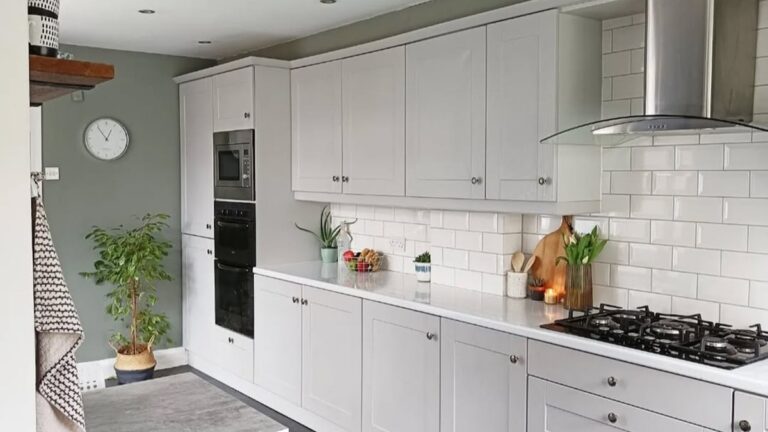
Before the makeover, the kitchen featured a light wood-look laminate finish paired with white subway tile, white countertops, and dark flooring.
The wood tone covered nearly every cabinet door and drawer front, making it one of the dominant finishes in the room. While functional, the finish offered little contrast against the surrounding surfaces and lacked the depth found in painted cabinetry.

The kitchen already had several features worth keeping. The subway tile backsplash remained in good condition, the countertops still worked well, and the layout provided substantial storage. The cabinet finish had become the biggest issue.
Removing the laminate opened the door for a different color palette without changing the structure of the kitchen itself.
A Custom Sage Green Replaced the Wood Tone

Instead of choosing an off-the-shelf cabinet color, she mixed her own shade using two paint colors: Frenchic Wise Old Sage and Frenchic Funky Dora.
The final result landed between sage green and soft olive, creating a muted tone that works with the white subway tile, white counters, and dark flooring. The color introduces contrast without overpowering the room.
The creator later shared that the cabinets were originally painted a different color first. After living with that choice for about a week, she decided it wasn’t right for the space and repainted the entire kitchen again using the custom mix.
That extra step paid off. The final color became one of the most discussed parts of the makeover and helped distinguish the kitchen from other painted cabinet projects.
The White Subway Tile Stood Out More

The kitchen already featured a classic white subway tile backsplash before the makeover.
With the original wood-tone cabinets, the tile blended into the background. After the cabinets received the new sage-green finish, the bright white tile became a stronger design feature.
The cabinet color helped frame the backsplash and created more contrast across the wall. Even though the tile itself never changed, it became far more noticeable once surrounded by darker cabinetry.
This is one of the reasons painted cabinet projects often have a larger impact than expected. Existing finishes can take on a different appearance when the surrounding colors change.
Existing Counters and Appliances Stayed in Place

One of the biggest cost-saving decisions involved keeping much of the existing kitchen intact.
The white countertops, stainless range hood, subway tile, and appliance layout all remained in place. Instead of replacing expensive components, the project focused on changing the surfaces that had become damaged.
The decision demonstrates how many kitchen makeovers can be accomplished without removing every major element. By concentrating on the cabinet doors, the project addressed the most visible problem while avoiding the cost and disruption of a complete remodel.
The existing storage, work surfaces, and kitchen footprint continued to function exactly as before.
Paint Delivered the Biggest Change

The transformation shows how much impact cabinet color can have on a kitchen.
No walls moved. No cabinets were replaced. The footprint remained the same. Yet the kitchen looks substantially different because the most visible surfaces received a new finish.
The makeover started with damaged laminate and ended with painted cabinetry that extended the life of the existing kitchen. It also provided a practical solution for homeowners dealing with peeling thermofoil doors who are not ready to invest in a full renovation.

What started as bubbling laminate became an opportunity to refresh the kitchen, preserve the existing layout, and avoid the cost of replacing an entire set of cabinets.
All credits go to Instagram creator @tippyandpeashouse.